BadgeCleaner – 個別にアプリのバッジを消すiOS 8 – 10対応のTweak

iPhoneやiPad、iPod touchなどの脱獄したデバイス向けに、アプリに付いたバッジを個別に消す『BadgeCleaner』というTweakを作成しました。
また、今回はオープンソースにすることで、脱獄アプリ開発も兼ねて紹介いたします。
Contents
BadgeCleanerの使用方法
過去に『BadgeClearer』というTweakが有ったのですが、iOS 8以降対応していなかったので、今回それ風のものを作成しました。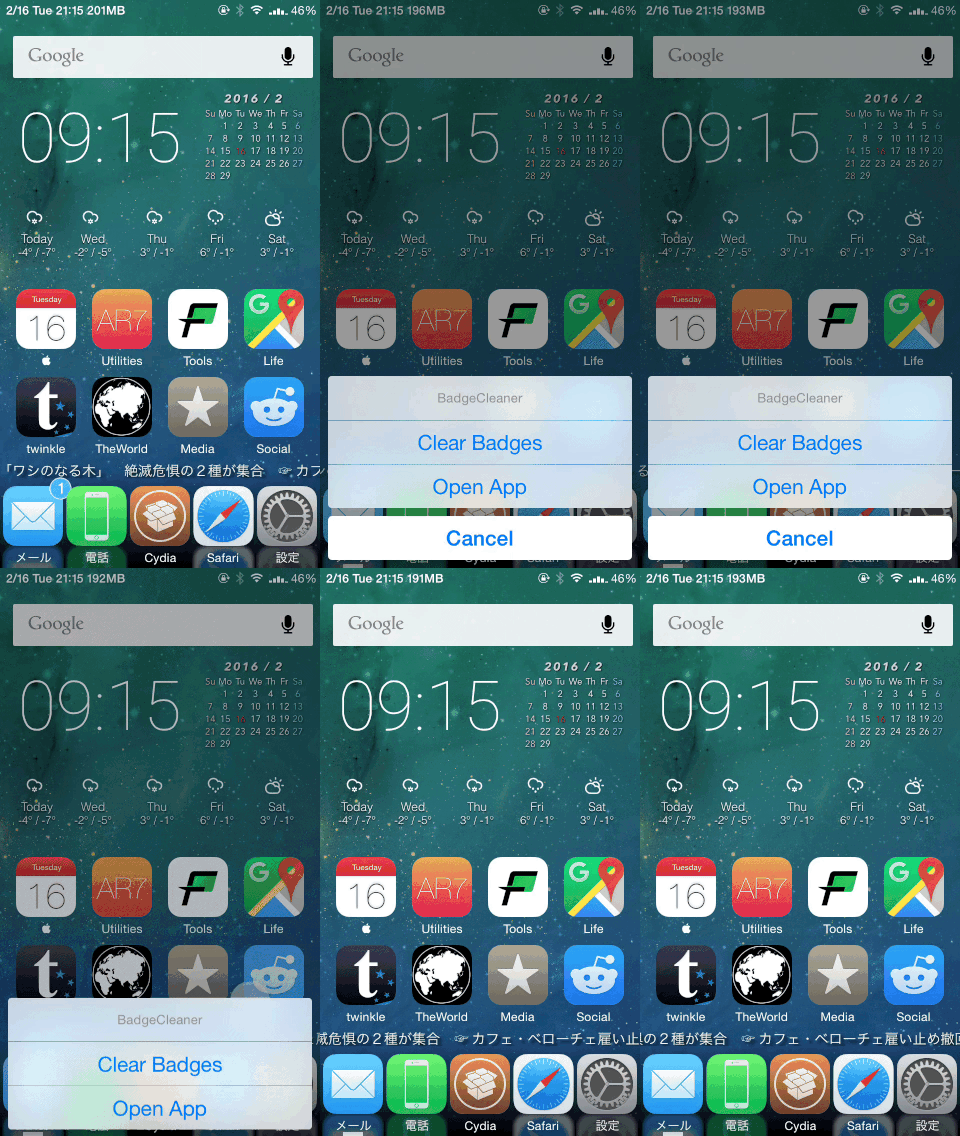
使用方法はシンプルで簡単です。
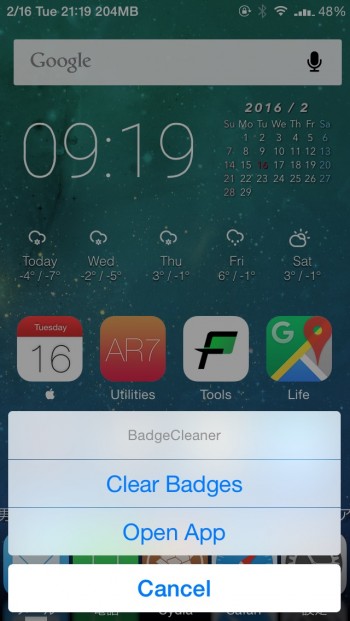
アプリにバッジがある場合、バッジを消すアクションシートがでるので、「Clear Badges」を選択するとバッジを消します。また、「Open App」を選択するとそのアプリが起動します。
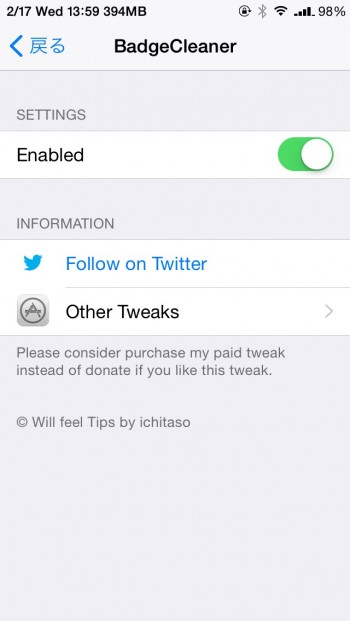
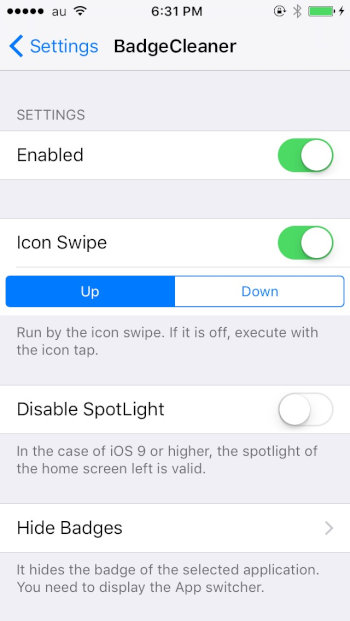
使わない時は、設定の「BadgeCleaner」にある「Enabled」をOFFにしてください。
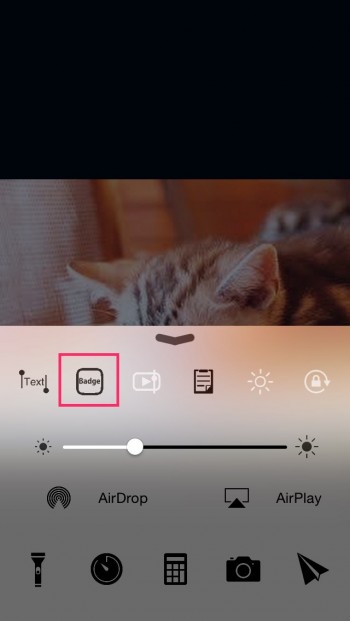
また、FlipswitchでもON/OFFすることができます。
今回こだわった点として、設定アプリから「Other Tweaks」を開くと、設定アプリ内で私の作品が簡単に閲覧できるようになっています。
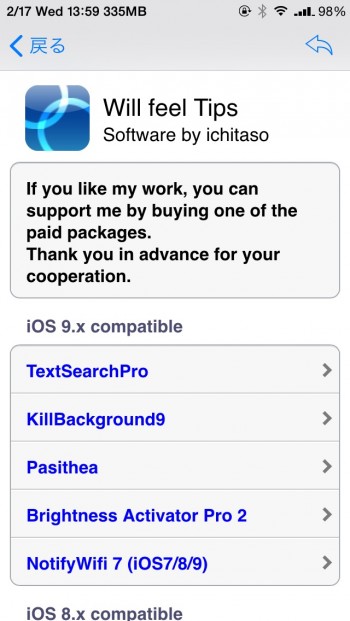
Donateとして、直接Paypalで寄付していただくよりも、苦労して開発した作品を購入していただくことで、双方に価値があると考えているので、このようにしています。
BadgeCleanerのインストール
ichitasoリポジトリからダウンロードすることが可能です。https://cydia.ichitaso.com/
リポジトリの登録は、Linkから「Tap to Here」をタップしてください。
(手動でもOKです)
価格:無料
対応デバイス:iOS 8~9のiPhone、iPad、iPod touch
BigBossにも提出しますので、そちらからリリースされたら消します。
更新情報
v1.0- First release
- iOS 9のiPadでクラッシュする問題を修正
- 「Hide Badges」機能を追加
選択したアプリのバッジを非表示にします。
- 「Icon Swipe」機能を追加
バッジの付いているアプリをスワイプした時にメニューを出す機能を付けました。 - 「Disable SpotLight」機能を追加
ONにするとスポットライトを無効にします。ただし、iOS 9の場合、ホーム画面左のスポットライトは有効です。
アイコンスワイプで同時にスポットライトが出ないように機能を追加しましたが、大体そのままでも問題ないので、標準ではOFFにしています(変更にはRespringが必要)
ホーム左側のスポットライトを無効にできる「SpotlightBeGone」というTweakの方がおすすめです。
v1.0-4 「Hide Badges」で設定したアプリで、フォルダ内でも反映されるように修正
v1.0-5 iOS 9.2 – 9.3.3をサポート
v1.0-6 フォルダを開いた時にクラッシュする問題を修正
v1.0-7 iOS 10(iOS 10.1.1/10.2)に対応
v1.0-8 「Icon Swipe」設定時にアイコンをスワイプアップ/ダウンを選択できるように追加
開発者向けの情報
今回作成したのは、@ChikuwaJB_blog氏の「ClearBadgeFlipSwitch」を参考にしました。ChikuwaJB/ClearBadgeFlipSwitch
ちなみに簡単なものですが、アイコンを作成しました。
実際にどうやってバッジを消すか
[[[[%c(SBIconViewMap) homescreenMap] iconModel] applicationIconForBundleIdentifier:identifier] setBadge:nil];このメソッドでバッジの値を空にします。
「identifier」は「Bundle Identifier」なので、例えばSafariだったら「com.apple.mobilesafari」になります。
アプリをタップした時にUIAlertControllerでActionSheetを出す
%hook SBIconControllerここをhookして、そのBundleIDを取得し、ActionSheetを出すようにしています。
- (void)_launchIcon:(id)arg1
ホーム画面などSpringBoard上でUIAlertControllerを使用する
UIAlertController *sheet = [UIAlertController alertControllerWithTitle:@"BadgeCleaner" message:nil preferredStyle:UIAlertControllerStyleActionSheet];このように、画面上にUIWindowを作って上げればOKです。
CGRect screenSize = [[UIScreen mainScreen] bounds];
UIWindow *window = [[UIWindow alloc] initWithFrame:screenSize];
window.windowLevel = 666666;
UIView *uv = [[UIView alloc] initWithFrame:screenSize];
[window addSubview:uv];
UIViewController *vc = [[UIViewController alloc] init];
vc.view.frame = [UIScreen mainScreen].applicationFrame;
window.rootViewController = vc;
[window makeKeyAndVisible];
[vc presentViewController:sheet animated:YES completion:nil];
(実行後に[window release];、window = nil;することを忘れずに)
タップしたアイコンのBundleIDを取得する
「- (void)_launchIcon:(id)arg1」の「arg1」にNSArrayでタップしたアイコンの情報が格納されているので、NSStringとNSRangeを使用してBundleIDを取得します。
NSMutableArray *array = [@[arg1] mutableCopy];NSLogで確認してもらうとわかりますが、「>"」この後にBundleIDが出力されるので、それを切り取って利用しています。
NSString *str = [array componentsJoinedByString:@";"];
if ([str respondsToSelector:@selector(rangeOfString:)]) {
NSRange found = [str rangeOfString:@"\">"];
if (found.location != NSNotFound) {
NSString *idStr = [str substringFromIndex:found.location + 3];
あとは、ちくわ氏のメソッドに当てはめてあげれば綺麗にバッジを消すことができます。
一つハマったポイントとして、アイコンをタップした時に、黒いシャドウが表示される問題が有りました。起動しなくても影を付けないようにしています。
%hook SBIconView機能が有効なときは影を付けないようにしてます。
- (void)setHighlighted:(BOOL)arg1
{
NSDictionary *dict = [NSDictionary dictionaryWithContentsOfFile:PREF_PATH];
isEnabled = [dict objectForKey:@"enabled"] ? [[dict objectForKey:@"enabled"] boolValue] : YES;
if (isEnabled) {
%orig(NO);
} else {
%orig();
}
}
%end
詳しくはGitHubを見てみてください。
https://github.com/ichitaso/BadgeCleaner
設定アプリのPreferenceLoaderでWebViewを表示する
今回作ってみた方法で、How Toなどにも利用できるかと思います。基本的にはUIKitで作れる「UIWebView」を使用します。
UIWebVIewは、融通が利いて、あまり複雑ではないので、簡単に実装できるかと思います。
plistに記述する部分
「detail」の部分で表示するクラスを指定します。cell PSLinkCell label Other Tweaks detail WFTWebView
今回は「WFTWebView」を表示させます。
static NSString * const InitialURL = @"http://willfeeltips.appspot.com/depiction/donate.html";このように「WFTWebBrowserViewController」でUIWebViewを表示する部分を作り、「WFTWebView」で実際に表示させています。設定内ではViewが食い込んだりするので、「_viewController.view.frame」の部分で調整しています。
@interface WFTWebBrowserViewController : UIViewController
{
UIWebView *webView;
}
@property (nonatomic, retain) UIWebView *webView;
@end
@implementation WFTWebBrowserViewController
@synthesize webView;
- (void)dealloc
{
[webView release];
[super dealloc];
}
- (void)viewDidLoad
{
CGRect webFrame = [[UIScreen mainScreen] applicationFrame];
self.webView = [[[UIWebView alloc] initWithFrame:webFrame] autorelease];
self.webView.autoresizingMask = (UIViewAutoresizingFlexibleWidth | UIViewAutoresizingFlexibleHeight);
[self.view addSubview:self.webView];
NSURL *url = [NSURL URLWithString:InitialURL];
NSURLRequest *request = [NSURLRequest requestWithURL:url];
[self.webView loadRequest:request];
}
- (void)viewDidUnload
{
[super viewDidUnload];
self.webView = nil;
}
- (void)btnBackPress
{
if (self.webView.canGoBack) {
[self.webView goBack];
}
}
- (void)btnNextPress
{
if (self.webView.canGoForward) {
[self.webView goForward];
}
}
@end
@interface WFTWebView : PSViewController
{
WFTWebBrowserViewController *_viewController;
UIView *view;
}
@end
@implementation WFTWebView
- (id)initForContentSize:(CGSize)size
{
CGRect r = [[UIScreen mainScreen] bounds];
CGFloat w = r.size.width;
CGFloat h = r.size.height;
if ([[PSViewController class] instancesRespondToSelector:@selector(initForContentSize:)]) {
self = [super initForContentSize:size];
} else {
self = [super init];
}
if (self) {
CGRect frame = CGRectMake(0, 0, w, h);
view = [[UIView alloc] initWithFrame:frame];
_viewController = [[WFTWebBrowserViewController alloc] init];
_viewController.view.frame = CGRectMake(_viewController.view.frame.origin.x, _viewController.view.frame.origin.y + 44, _viewController.view.frame.size.width, _viewController.view.frame.size.height - 44);
[view addSubview:_viewController.view];
if ([self respondsToSelector:@selector(navigationItem)]) {
//Set Back Button
UIBarButtonItem *rightButton =
[[UIBarButtonItem alloc] initWithBarButtonSystemItem:UIBarButtonSystemItemReply
target:self
action:@selector(btnBackPress)];
[[self navigationItem] setRightBarButtonItem:rightButton];
[rightButton release];
}
}
return self;
}
- (UIView *)view
{
return view;
}
- (CGSize)contentSize
{
return [view frame].size;
}
- (void)dealloc
{
[_viewController release];
[view release];
[super dealloc];
}
- (void)btnBackPress
{
[_viewController btnBackPress];
}
@end
「static NSString * const InitialURL = @"";」ここのURLを変えれば指定したURLが開きます。
例えばそのアプリの使い方へのURLにすれば、色々使えますね!
あとは、UIToolBarが設置できなかったので、右上のナビゲーションバーに「戻る」ボタンだけ付けました。複雑なWebページを表示させたい場合は、素直にSafariで開くようにした方がいいかと思います。
[[UIApplication sharedApplication] openURL:[NSURL URLWithString:@"表示させたいURL"]];という感じで、また何か有りましたらTwitterなどで教えて下さい。

